Imagine you’re using a VPN, feeling secure as you browse, stream, or torrent. But what if your real browsing activity is still visible to your ISP or hackers? This is the reality for millions due to a hidden vulnerability called DNS leaking.
If you care about online privacy, understanding DNS leaks—and how to prevent them—is essential. In this guide, you’ll learn what DNS leaking is, why it matters, and actionable steps to protect yourself. Let’s dive in.
What is DNS Leaking? (Primary Keyword)
DNS leaking occurs when your device sends DNS requests outside your secure VPN tunnel, exposing your browsing activity to your Internet Service Provider (ISP) or third parties—even when you think you’re protected.
How DNS Works
- DNS (Domain Name System) is like the internet’s phonebook. When you type a website address (like google.com), your device asks a DNS server to translate it into an IP address.
- Normally, your ISP provides the DNS server, so they can see every site you visit.
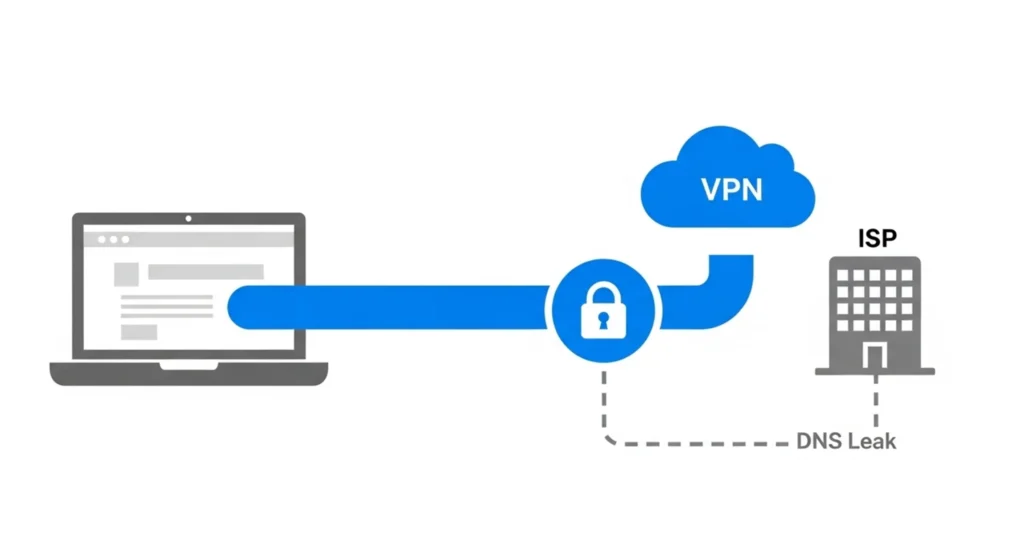
What Happens When You Use a VPN?
A VPN (Virtual Private Network) is supposed to route all your internet traffic—including DNS requests—through an encrypted tunnel to a secure server. This hides your activity from your ISP and others.
But with a DNS leak, your device still uses your ISP’s DNS server, exposing your browsing history.
Why is DNS Leaking a Serious Privacy Risk?
- ISP Tracking: Your ISP can log every website you visit, even with a VPN.
- Government Surveillance: In some countries, ISPs are required to share user data with authorities.
- Hackers & Cybercriminals: Unencrypted DNS requests can be intercepted, leading to phishing or man-in-the-middle attacks.
- Geo-Restrictions Bypass Failure: If streaming services detect your real DNS, they can block content or ban your account.
Case Study:
In 2018, a popular VPN provider was found to have DNS leaks, exposing users’ real locations and browsing habits. This led to a wave of privacy concerns and forced the company to overhaul its security protocols.
How to Check for DNS Leaks
Step 1: Connect to your VPN.
Step 2: Visit a DNS leak test site like dnsleaktest.com.
Step 3: Run the test. If you see your ISP’s DNS servers, you have a leak.
Pro Tip: Run tests on multiple devices and browsers, as leaks can be device- or app-specific.
Common Causes of DNS Leaks
1. VPN Misconfiguration
Some VPNs don’t force all DNS requests through their tunnel, especially on older protocols or poorly designed apps.
2. Operating System Settings
Windows, for example, uses a feature called “Smart Multi-Homed Name Resolution” that can send DNS requests outside the VPN.
3. Browser Plugins and Extensions
Certain browser extensions can override VPN settings and leak DNS requests.
4. IPv6 Leaks
Many VPNs only protect IPv4 traffic, leaving IPv6 DNS requests exposed.
How to Prevent DNS Leaking: 7 Proven Methods
1. Choose a VPN with Built-in DNS Leak Protection
Not all VPNs are created equal. Look for providers that:
- Offer DNS leak protection as a feature.
- Operate their own private, no-log DNS servers.
- Have a strong privacy policy and independent audits.
2. Manually Set Your DNS Servers
Change your device’s DNS settings to use secure, privacy-focused DNS providers:
- Cloudflare DNS: 1.1.1.1
- Google DNS: 8.8.8.8
- OpenDNS: 208.67.222.222
How-To:
- On Windows: Go to Network & Internet > Change Adapter Options > Right-click your connection > Properties > Internet Protocol Version 4 > Use the following DNS server addresses.
- On Mac: System Preferences > Network > Advanced > DNS.
3. Disable IPv6
If your VPN doesn’t support IPv6, disable it to prevent leaks.
- Windows: Control Panel > Network and Sharing Center > Adapter Settings > Right-click > Properties > Uncheck “Internet Protocol Version 6 (TCP/IPv6)”.
- Mac: Terminal command:
networksetup-setv6off Wi-Fi
4. Use Secure Browsers and Extensions
- Use privacy-focused browsers like Brave or Firefox.
- Avoid extensions that modify network settings unless you trust them.
5. Enable VPN Kill Switch
A kill switch automatically blocks all internet traffic if your VPN disconnects, preventing accidental leaks.
6. Regularly Test for Leaks
Make DNS leak tests part of your routine, especially after VPN updates or OS changes.
7. Use Encrypted DNS (DoH/DoT)
- DNS over HTTPS (DoH) and DNS over TLS (DoT) encrypt DNS requests, making them harder to intercept.
- Firefox and Chrome support DoH natively. Enable it in browser settings.
Check your IP address location
Real-World Example: DNS Leak in Public Wi-Fi
Scenario:
You connect to a coffee shop’s Wi-Fi and turn on your VPN. But the network’s DNS settings override your VPN, leaking your browsing activity to the café’s ISP.
Solution:
- Always check for DNS leaks on public Wi-Fi.
- Use a VPN with strong DNS leak protection and a kill switch.
Conclusion: Take Control of Your Online Privacy
DNS leaking is a silent threat that can undermine your online privacy—even with a VPN. By understanding what DNS leaks are, how they happen, and how to prevent them, you can browse, stream, and work online with confidence.
Take action today:
- Test your connection for DNS leaks.
- Choose a VPN with strong DNS leak protection.
- Update your DNS settings and disable IPv6 if needed.
Your privacy is worth protecting. Don’t let DNS leaks compromise your security.